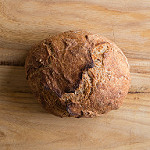
No-Knead Bread
Yes, this is real bread — the kind made with yeast, that you have to let rise. But it is really easy to make because you don’t need to knead it! And once you get the hang of it, you might find yourself making it all the time. This bread is definitely great for your sandwiches, but it also goes well with soups and salads.
kitchen gear
-
Large bowl
-
Measuring cup
-
Measuring spoons
-
Large spoon, for stirring
-
Plastic wrap
-
Oven-safe pot or casserole, with a cover or lid
-
Pot holders
-
Cooling rack or plate
Ingredients
- 2 1⁄4 cups all-purpose white flour
- 1 cup whole-wheat flour
- 1 package (2 1⁄2 teaspoons) active dry yeast
- 2 teaspoons kosher salt
- 1 1⁄2 cup plus 1 tablespoon warm water
- 2 tablespoons cornmeal (or additional flour) if necessary
Instructions
-
Put the flours, yeast, and salt in the bowl and stir well. Add the water and use the spoon and/or your clean hands to mix until there are no dry patches. The texture of the dough may (or may not) seem all wrong: too loose, too shaggy, too sticky. This is fine.
-
Cover the bowl with plastic wrap and let it rise at a warm room temperature for at least 2 and up to 5 hours.
-
If the dough is still very wet, lightly sprinkle the cornmeal (or additional flour) across the surface of the dough. Turn the dough in your hands to form a ball, allowing the ball to be lightly coated with cornmeal. If your hands get doughy, stop what you’re doing. Wash and dry them, sprinkle a bit of flour over the dough, and try again.
-
Put the dough back in the bowl, cover the bowl with the plastic wrap, and set it aside to rise for 40 minutes.
-
After the dough has been back in the bowl for 20 minutes, turn the oven on and set the heat to 450 degrees. Put the lidded pot or casserole in the oven to preheat. It is very important that the oven and pot be properly preheated.
-
Carefully open the oven door and take the pot out and put it on the stovetop.
-
Use pot holders to remove the lid and put the ball of dough in the hot pot. It may not land in the middle or may seem like it’s sticking. This is fine. Replace the lid (it’s still hot — use pot holders), and put the pot back in the oven.
-
Bake for 25 minutes, covered, then carefully remove the lid, using pot holders, and bake until the crust is browned, 15–25 minutes longer.
-
Use pot holders to carefully remove the pot from the oven. Tip the pot so that the bread falls out onto the counter. Set aside to cool on the rack or plate for about 15 minutes, then slice and enjoy!
Notes
Bake your bread in a traditional loaf pan. Follow the exact same instructions for preheating the pan, then just stretch the dough ball a bit so that when you put it in, it will fill the length of the pan. Cover with aluminum foil (you’ll need to use pot holders for this) then bake the same way we describe above.
Rate this recipe
Click on a star to rate it!
Average rating 0 / 5. Vote count: 0
No votes so far! Be the first to rate this post.